Luma 55 Frame Assembly guide. v1.1

Kit contents:
| Hardware: | Carbon: | |||
| 4x | 28mm Aluminum standoff. | 1x | 2.5mm Top-plate. | |
| 2x | 20mm Aluminum standoff. | 1x | 2mm Mid-plate. | |
| 9x | Steel M3 12mm. (12.9 grade) | 1x | 2.5mm Bottom-plate. | |
| 5x | Steel M3 8mm. (12.9 grade) | 4x | 6x8mm Arms. | |
| 9x | Steel M3 10mm. (12.9 grade) | |||
| 7x | M3 Steel Washer. | |||
| 9x | M3 Steel Pressnut. | Extras: | ||
| 5x | M3 Silicone soft-mount gummies. | 1x |
|
|
| 1x | M5 Steel Clinch Nut. | 2x | Luma 250mm Lipo Straps. | |
| 1x | M5 20mm Flathead Bolt. | |||
| 5x | M3 Steel 20mm. (12.9 grade) | |||
| 5x | M2 Steel 20mm. (12.9 grade) | |||
| 5x | M2 Steel Nut | |||
|
TPU parts:
|
||||
| 1x | Front bumper. | |||
| 4x | Arm Bumpers. | |||
| 4x | Arm Wire Protectors. | |||
| 4x | Mini to Nano FPV camera mounts. | |||
| 1x | Front GoPro Hard mount. | |||
| 1x |
Rear Vista antenna and T mount
|
|||
| 1x | Rear SMA antenna and T mount | |||
| 1x | 20x20 M3 stack RX mount. | |||
| 1x | 20x20 M2 stack RX mount. |
LUMA 55 BUILD GUIDE v1.0
This is the Mid plate.
Note the notch at the top of the image, this indicates the back of the frame.

It has no notch and the flat end at the bottom indicates the front of the frame.
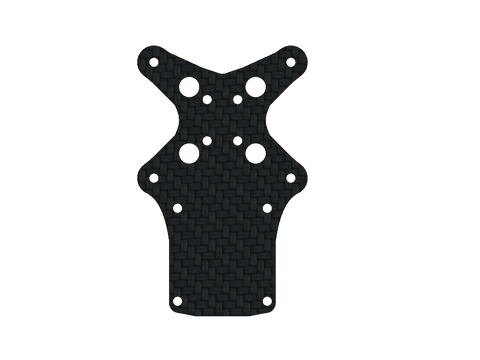
Install 8x Press nuts into the 8x holes in the Mid plate as follows.


DO NOT USE A HAMMER!
Install The Main stack Gummies:


Check out the following video for the correct way to install Gummies into the carbon Mid plate using dental floss, fishing wire or thread.
Insert 8x 12mm M3 Cap head bolts through the Bottom plate.


Note: A single design is used for all 4 arms.
Orientate them so the rounded corners go on the top and bottom and the sharper corners are on the sides.

Attach each arm to the Bottom plate over the 12mm bolts.


Place the Mid plate loosely on top.

Flip the frame over and pick up any bolts you dropped ;)

Screw each 12 MM bolt in a single turn at a time using Loctite Blue 242 Threadlocker.
Work your way around multiple times until the whole thing comes together evenly.
Once everything's locked in nice and square you can go around and give it a final tighten.


Take 4x 10mm Bolts 2x M3 washers and the Front Bumper print.

Install washers on the front two bolts and insert through the Bumper into the bottom of the Bottom plate.
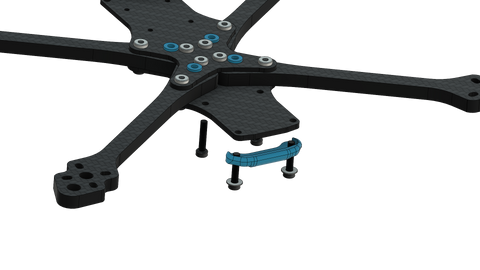

Secure with 4x 28mm Standoffs.


Insert your FPV camera mounts over the front 2 standoffs.


Grab 2x 8mm Bolts and do the same for the rear 2 holes, using 2x 20mm standoffs to secure.


Insert the rear antenna mount over the rear standoffs.


Insert 4x 20mm M3 bolts through the main stack gummies, twist gently and slowly so you don't pop the gummies out.


Use stack spacer prints if required to add some clearance so your ESC sits clear of the press nuts and carbon.


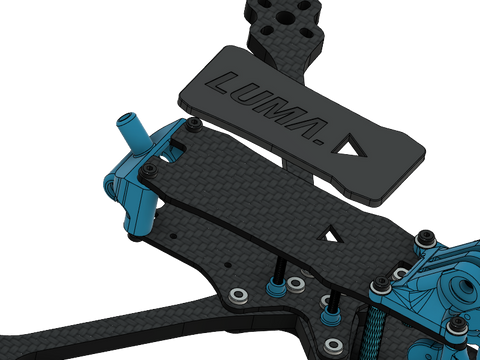
Install the Top-plate, triangle pointing to the front.

Grab 4x 10mm M3 bolts, 4x M3 Washers and the HD Mount Print.
Insert the 4 bolts through the 4 washers into the top of the mount and secure to the 4 28mm Standoffs.


Use 2x 8mm M3 bolts for the rear two holes.


Line up the Lipo pad with the triangle and stick it to the Top plate

Insert the M5 Clinch nut into the HD mount print.
Note: The nut will seat inside the lip of the print and not fall out if you seat it properly, use a little force to get it past the lip.


Arm bumpers go on the end of the arms.


The Printed Arm wire guards go over the motor wires and are secured with electrical tape.


